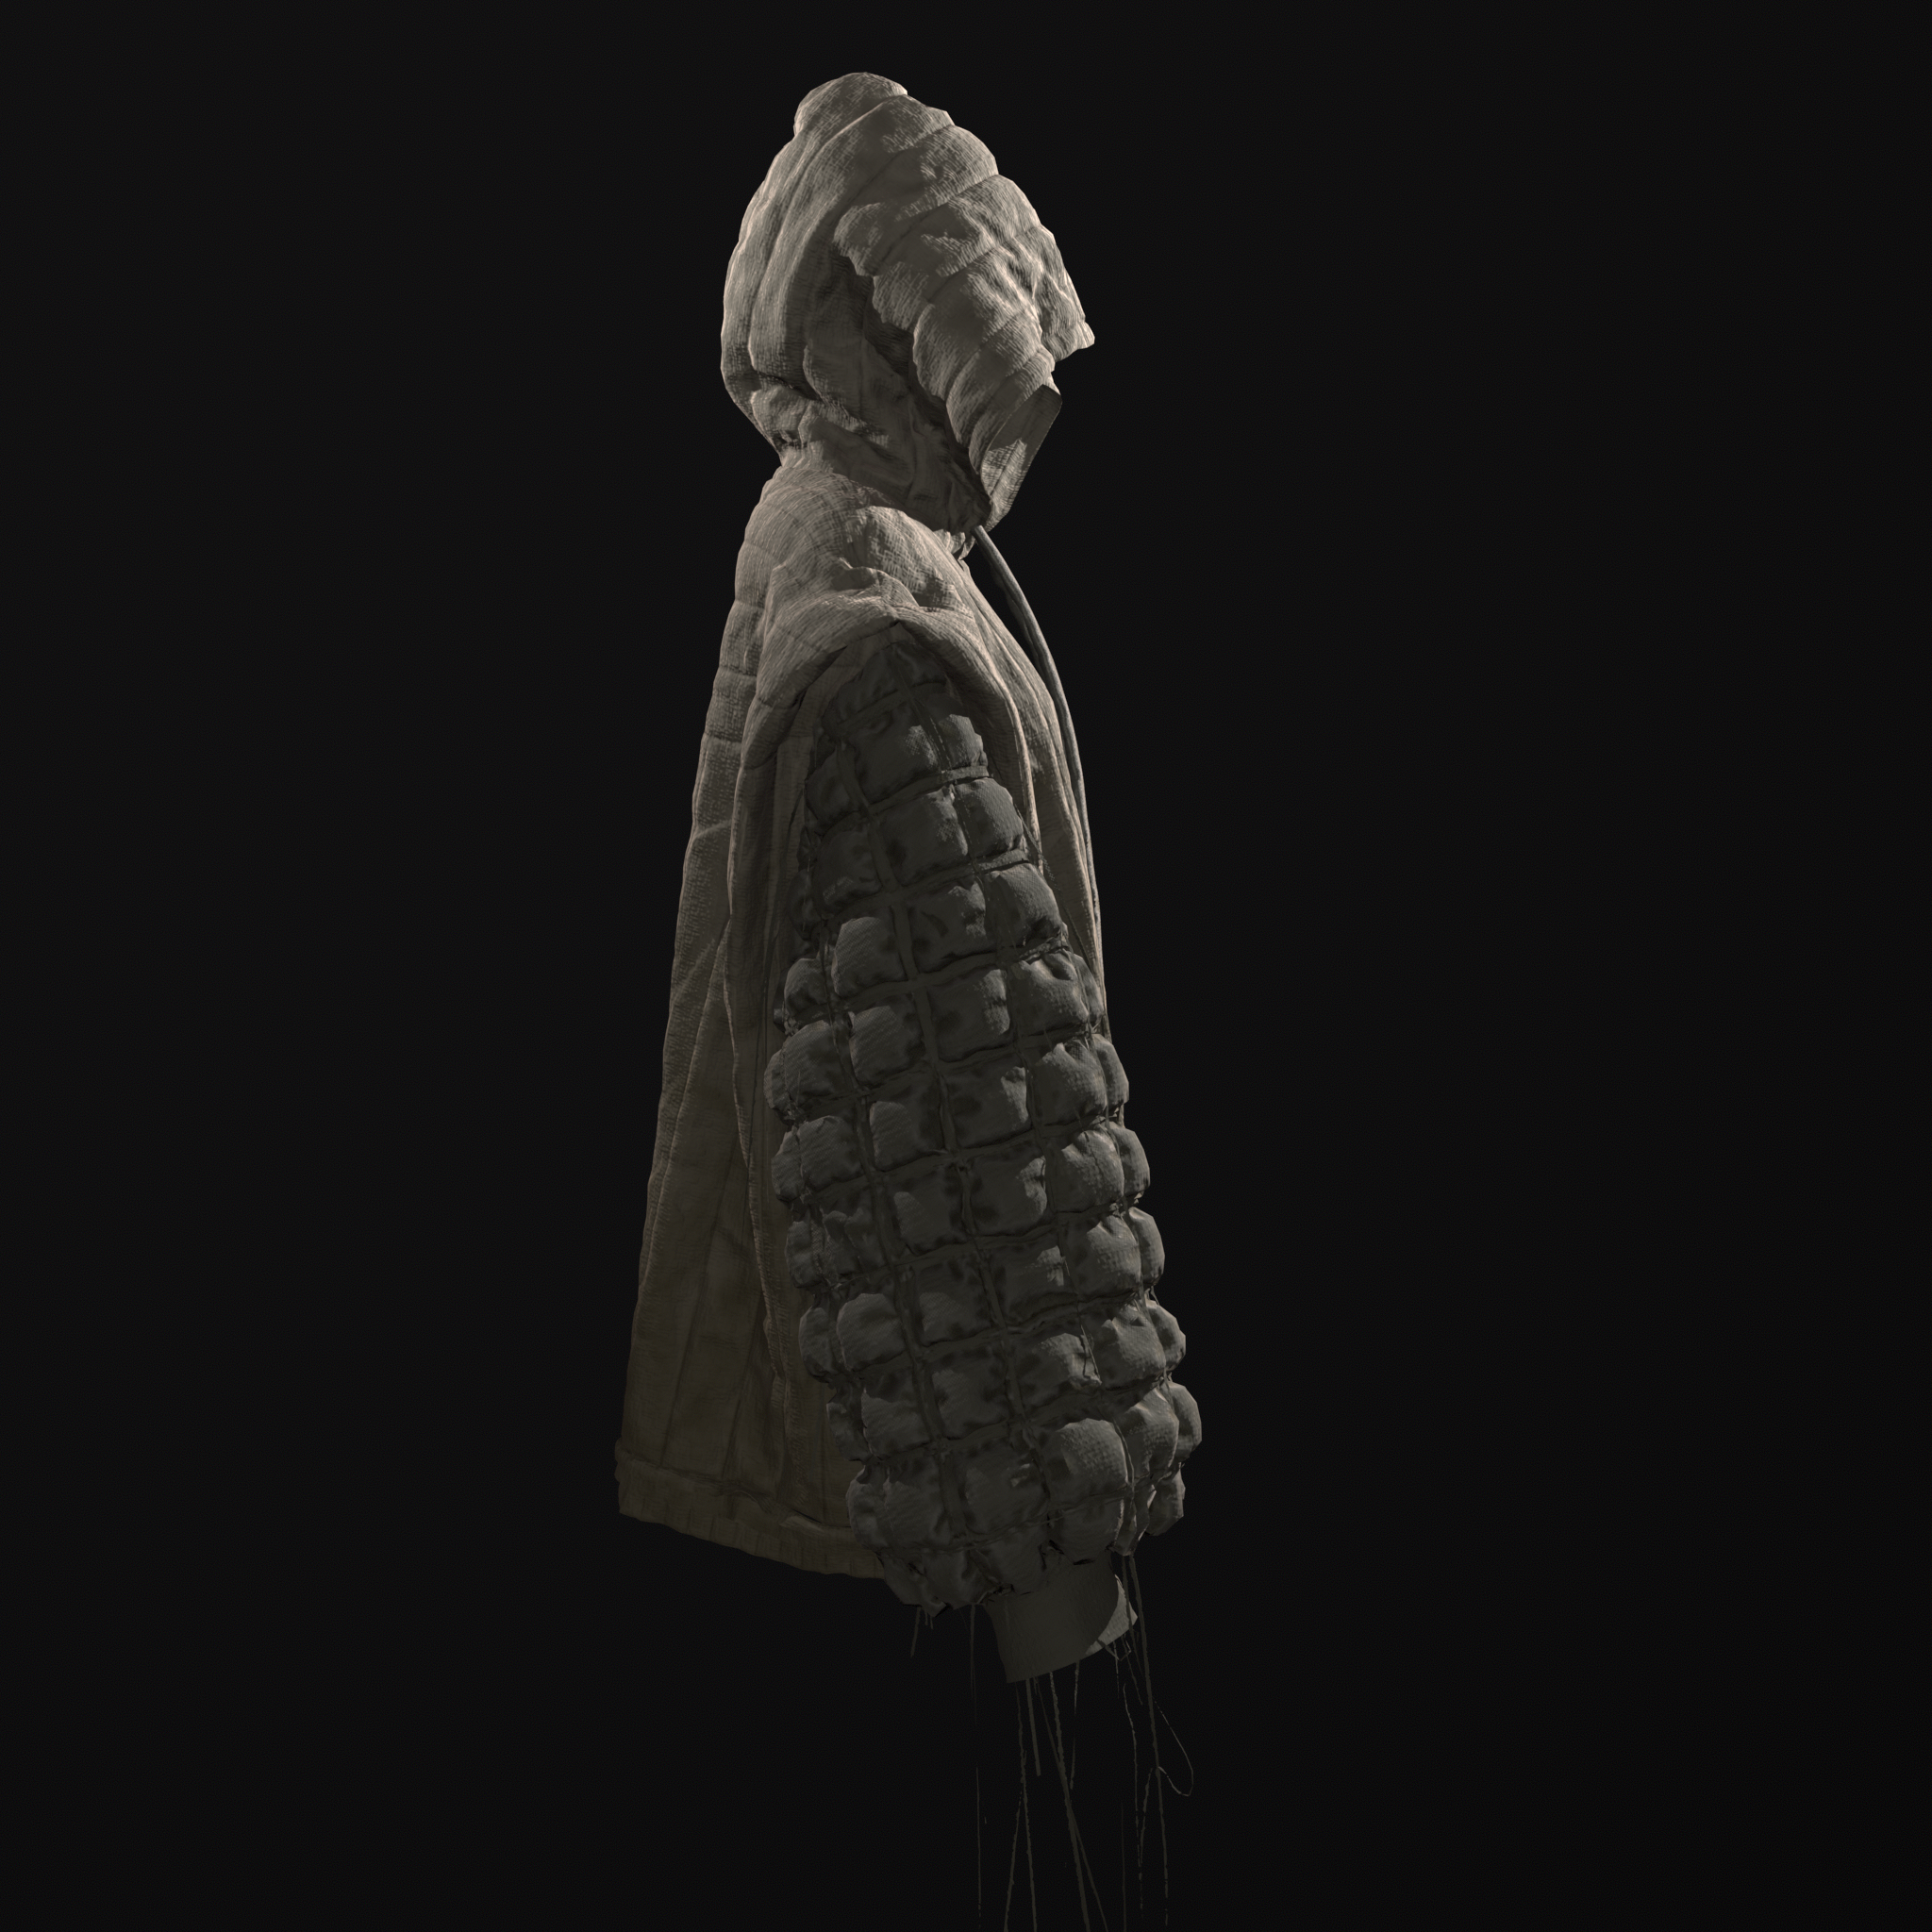
This is inspired by the monster hoodie seen in Elena Velez's "How's My Driving?" Collection. Loved the puffer detail on the sleeves!
I started the jacket in Marvelous Designer. Then I brought it into Maya to retopologize and re-UV. With this project, I also made some alphas using Marvelous Designer, Z-brush, and Photoshop. Used those alphas in both sculpt and texture. All texturing was done in Substance 3D Painter and look dev-ed in Marmoset.
A puffer jacket is one of the first things I teach during my course "Cloth Creation and Simulation for Real-time" over at CG Master Academy.
I'm so excited to show this character I've been working on. I wanted to try out a stylized character and I fell in love with Mawa's artwork and used one of their illustrations as my inspiration. I had so much fun diving into Unreal and creating cel shaders. For the project, I wanted to block out the clothing in Marvelous Designer, and then sculpt in Zbrush so that I can give it more of a stylized look. I really had so much fun making this angel, and I'm excited to make more projects in Unreal!
Programs Used:
Unreal
Autodesk Maya
Zbrush
Substance Painter
Marvelous Designer
Photoshop
Premiere
Arnold
I'm so excited to show this dress. I always wanted to do something from the Edwardian period! Through this piece, I wanted to see how much I can do in Marvelous Designer. I did retopology in Marvelous Designer, and I was surprised at how well that worked out! I also attended Brandon's Marvelous Designer talk during Zbrush Summit last year where he discussed how to use MD for creating alphas for Zbrush, and I really enjoyed using his method for creating my own and applying it to this dress. This piece is rendered in Maya/Arnold and textures were done using procedurals in the hypershade
I was able to look dev Vader for another billboard Tippett Studios did in collaboration with ILM. I was excited to work on such a recognizable character, and learned a lot about all the subtle things on Vader that ultimately creates his iconic look. I’m linking the breakdown video so you guys can see him in action!
Darth Vader Billboard Breakdown
© 2022 Disney. All Rights Reserved.
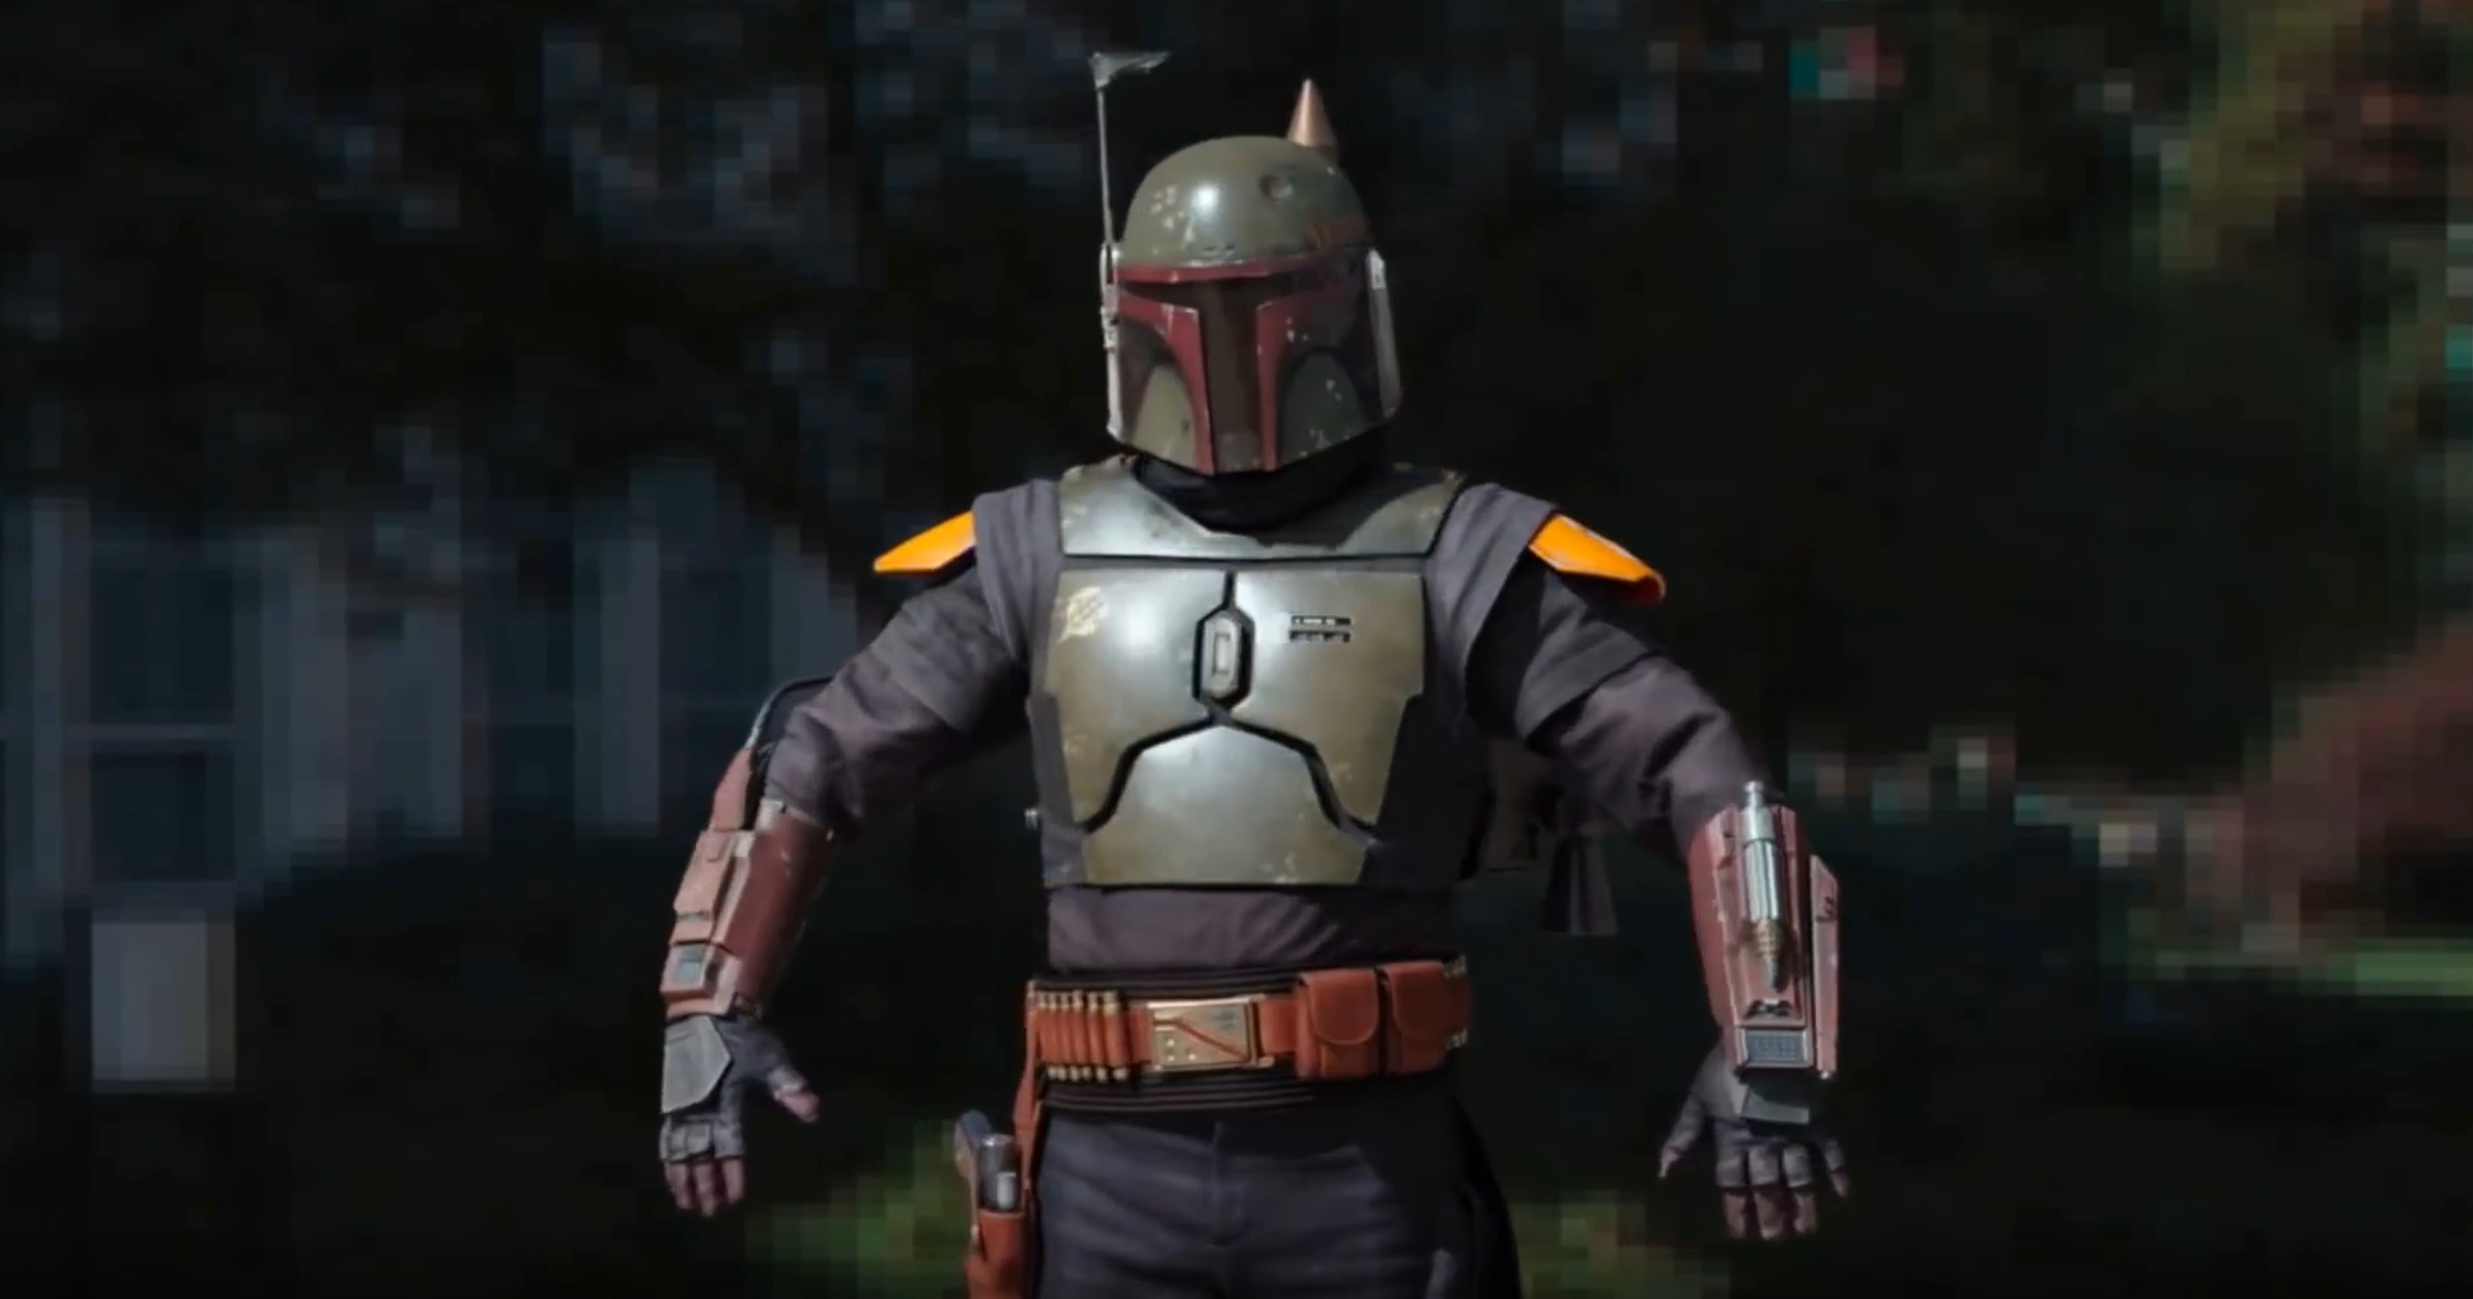
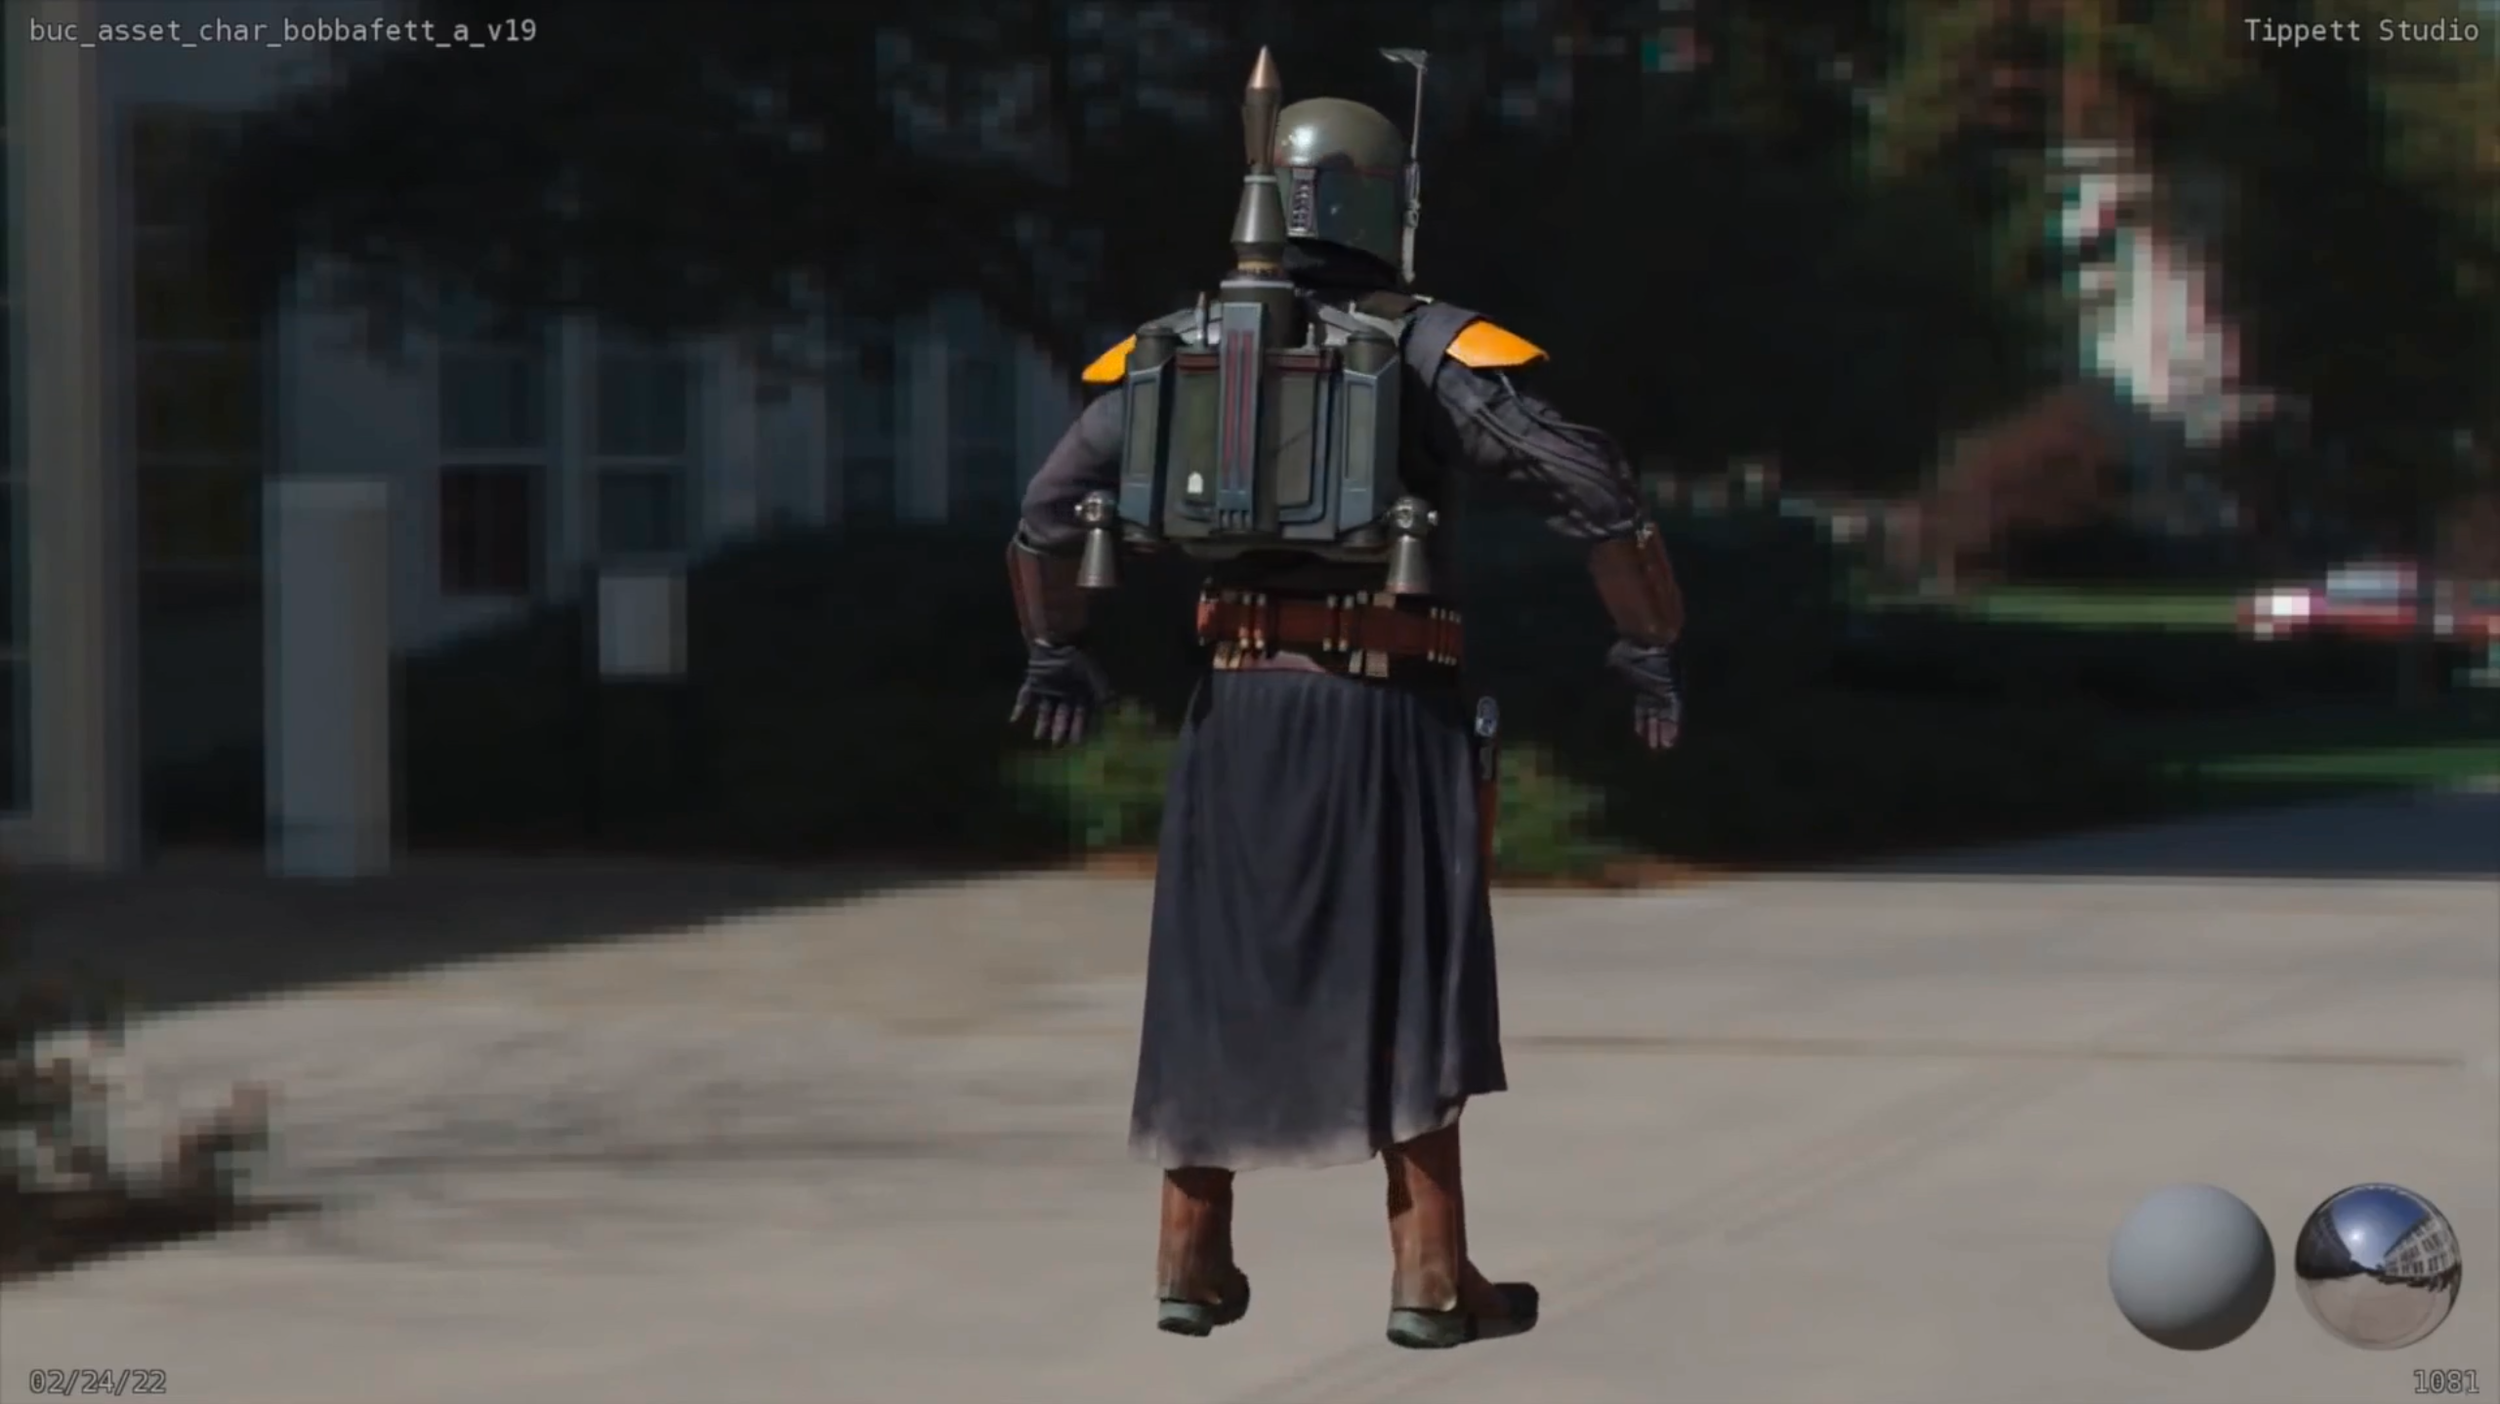
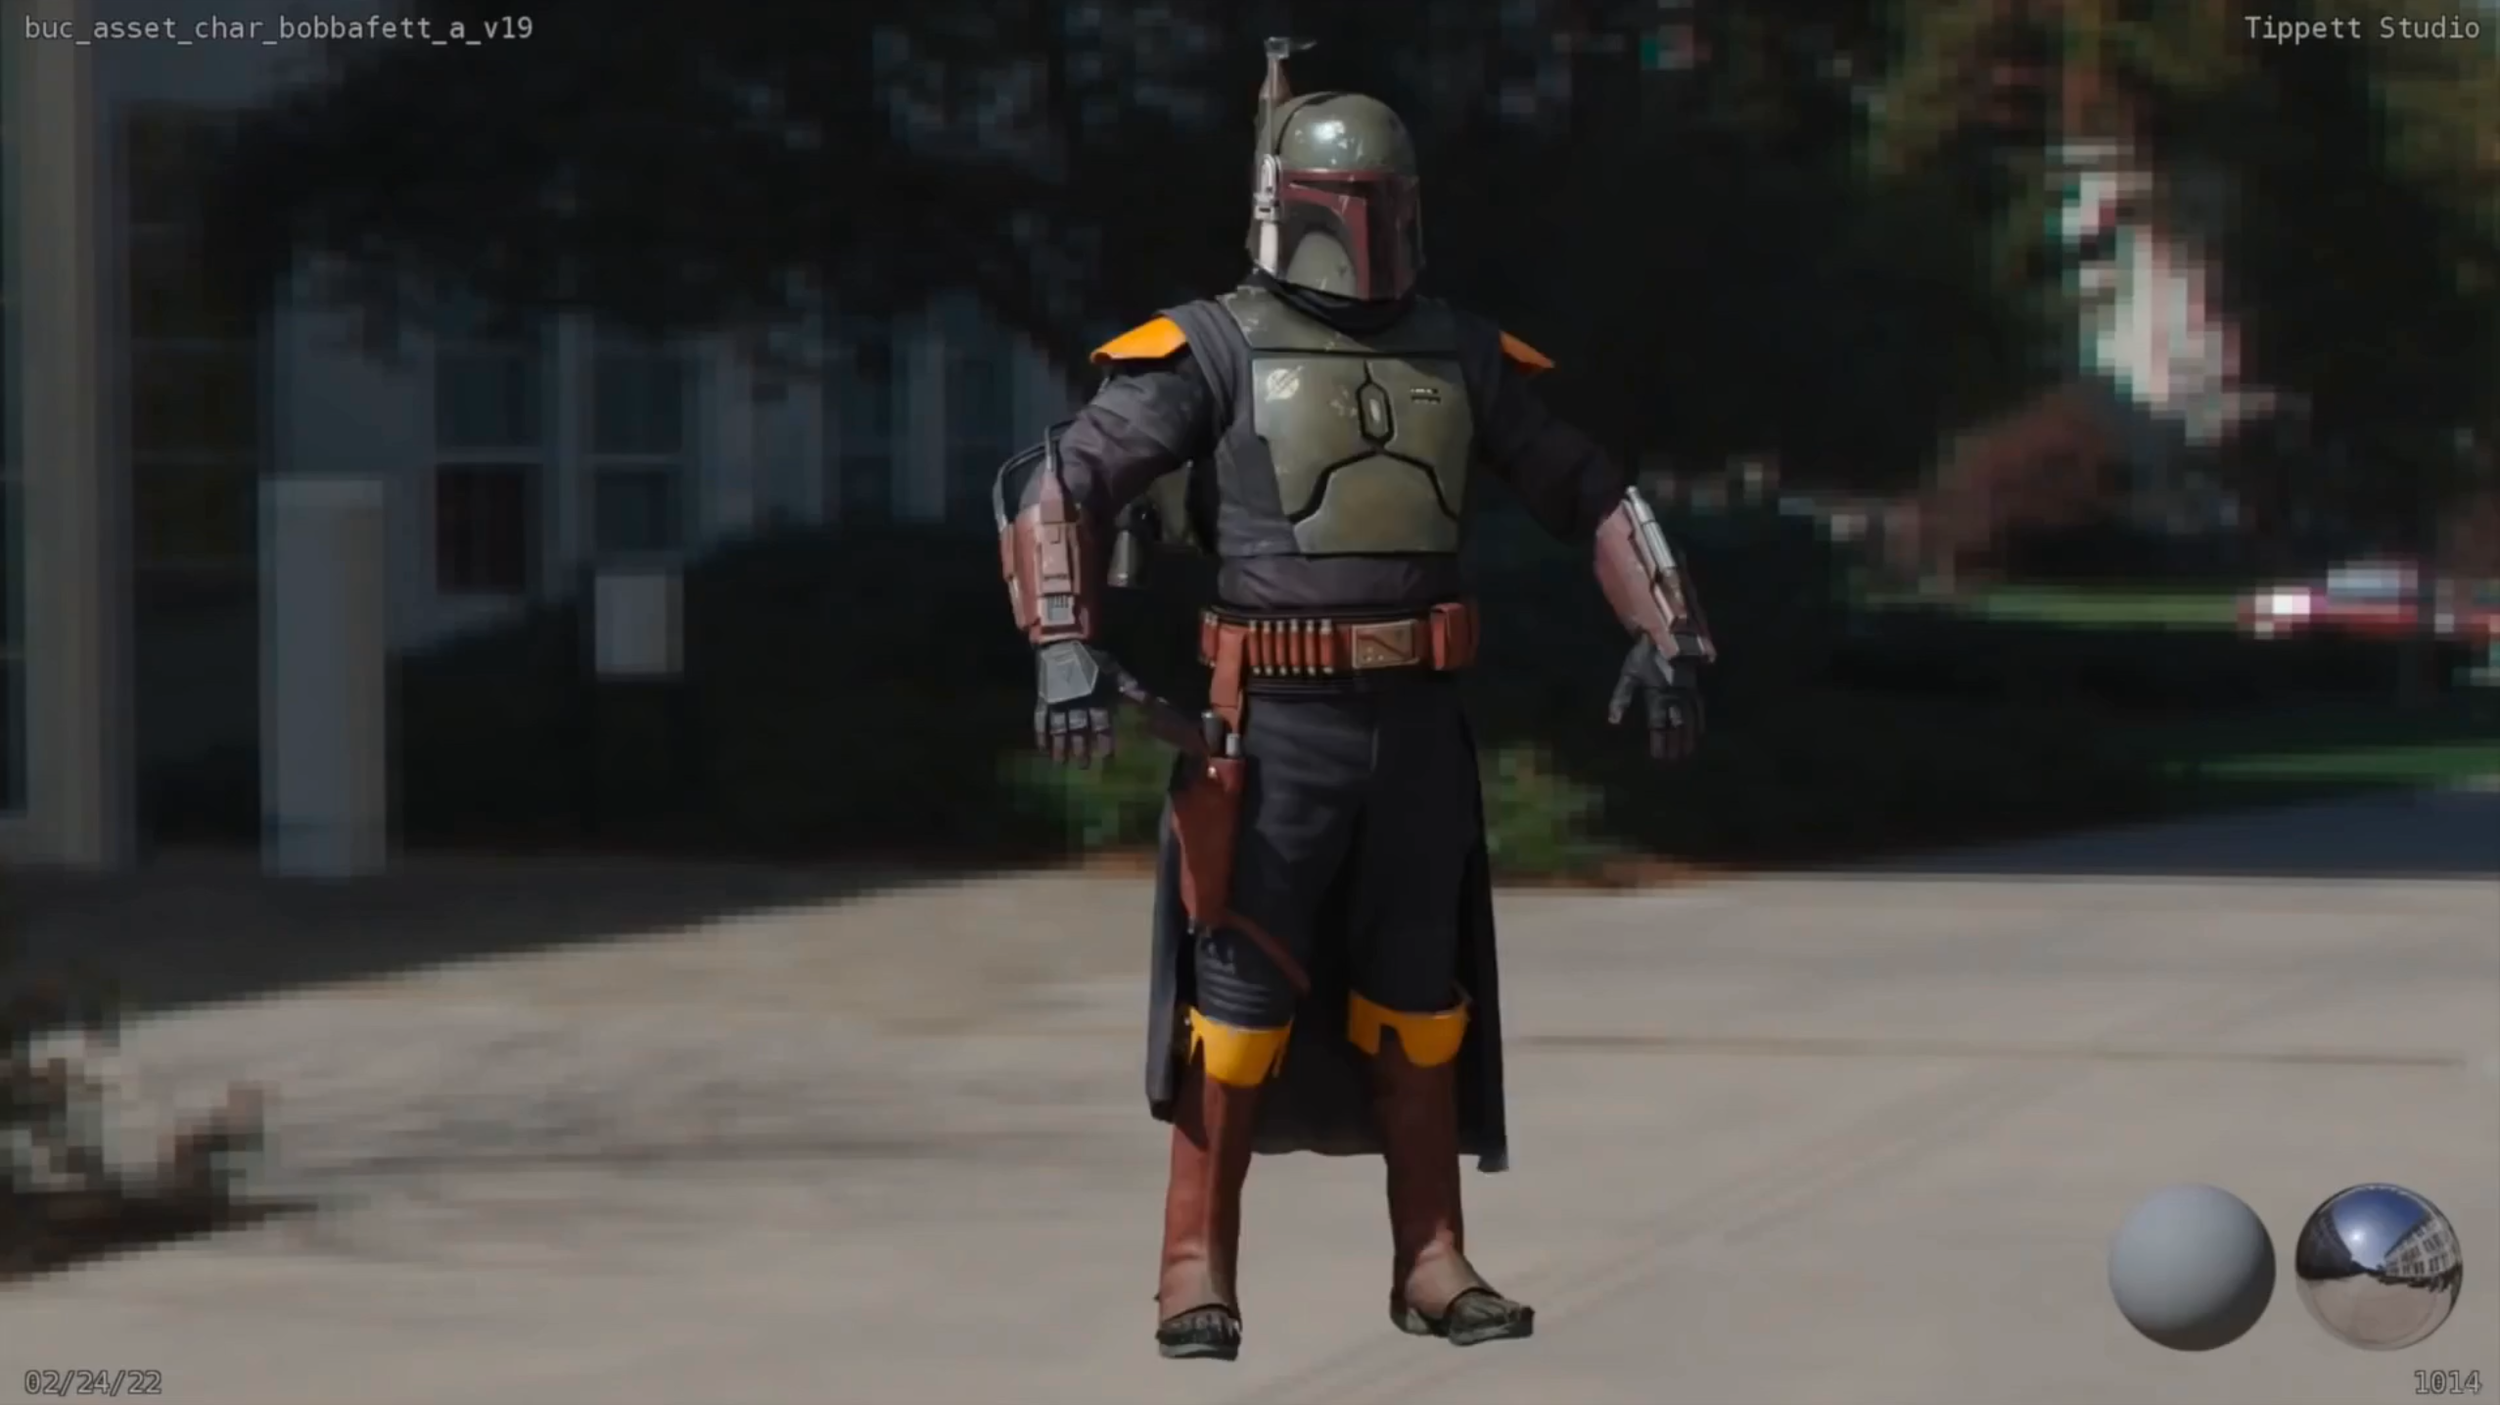
My first task at Tippett Studios was to look dev Boba Fett for the LG 3D Billboard in Times Square. The textures were provided by ILM and they were so amazing that look-deving this character was such a fun task. I used Mari for textures (Again, the base textures were already provided so I just went in and did some minor tweaks so that it works for our project) and look dev-ed in Katana. I’m linking my post on Artstation, so you guys can check out the videos of the billboard and the behind the scenes.
© 2022 Disney. All Rights Reserved.
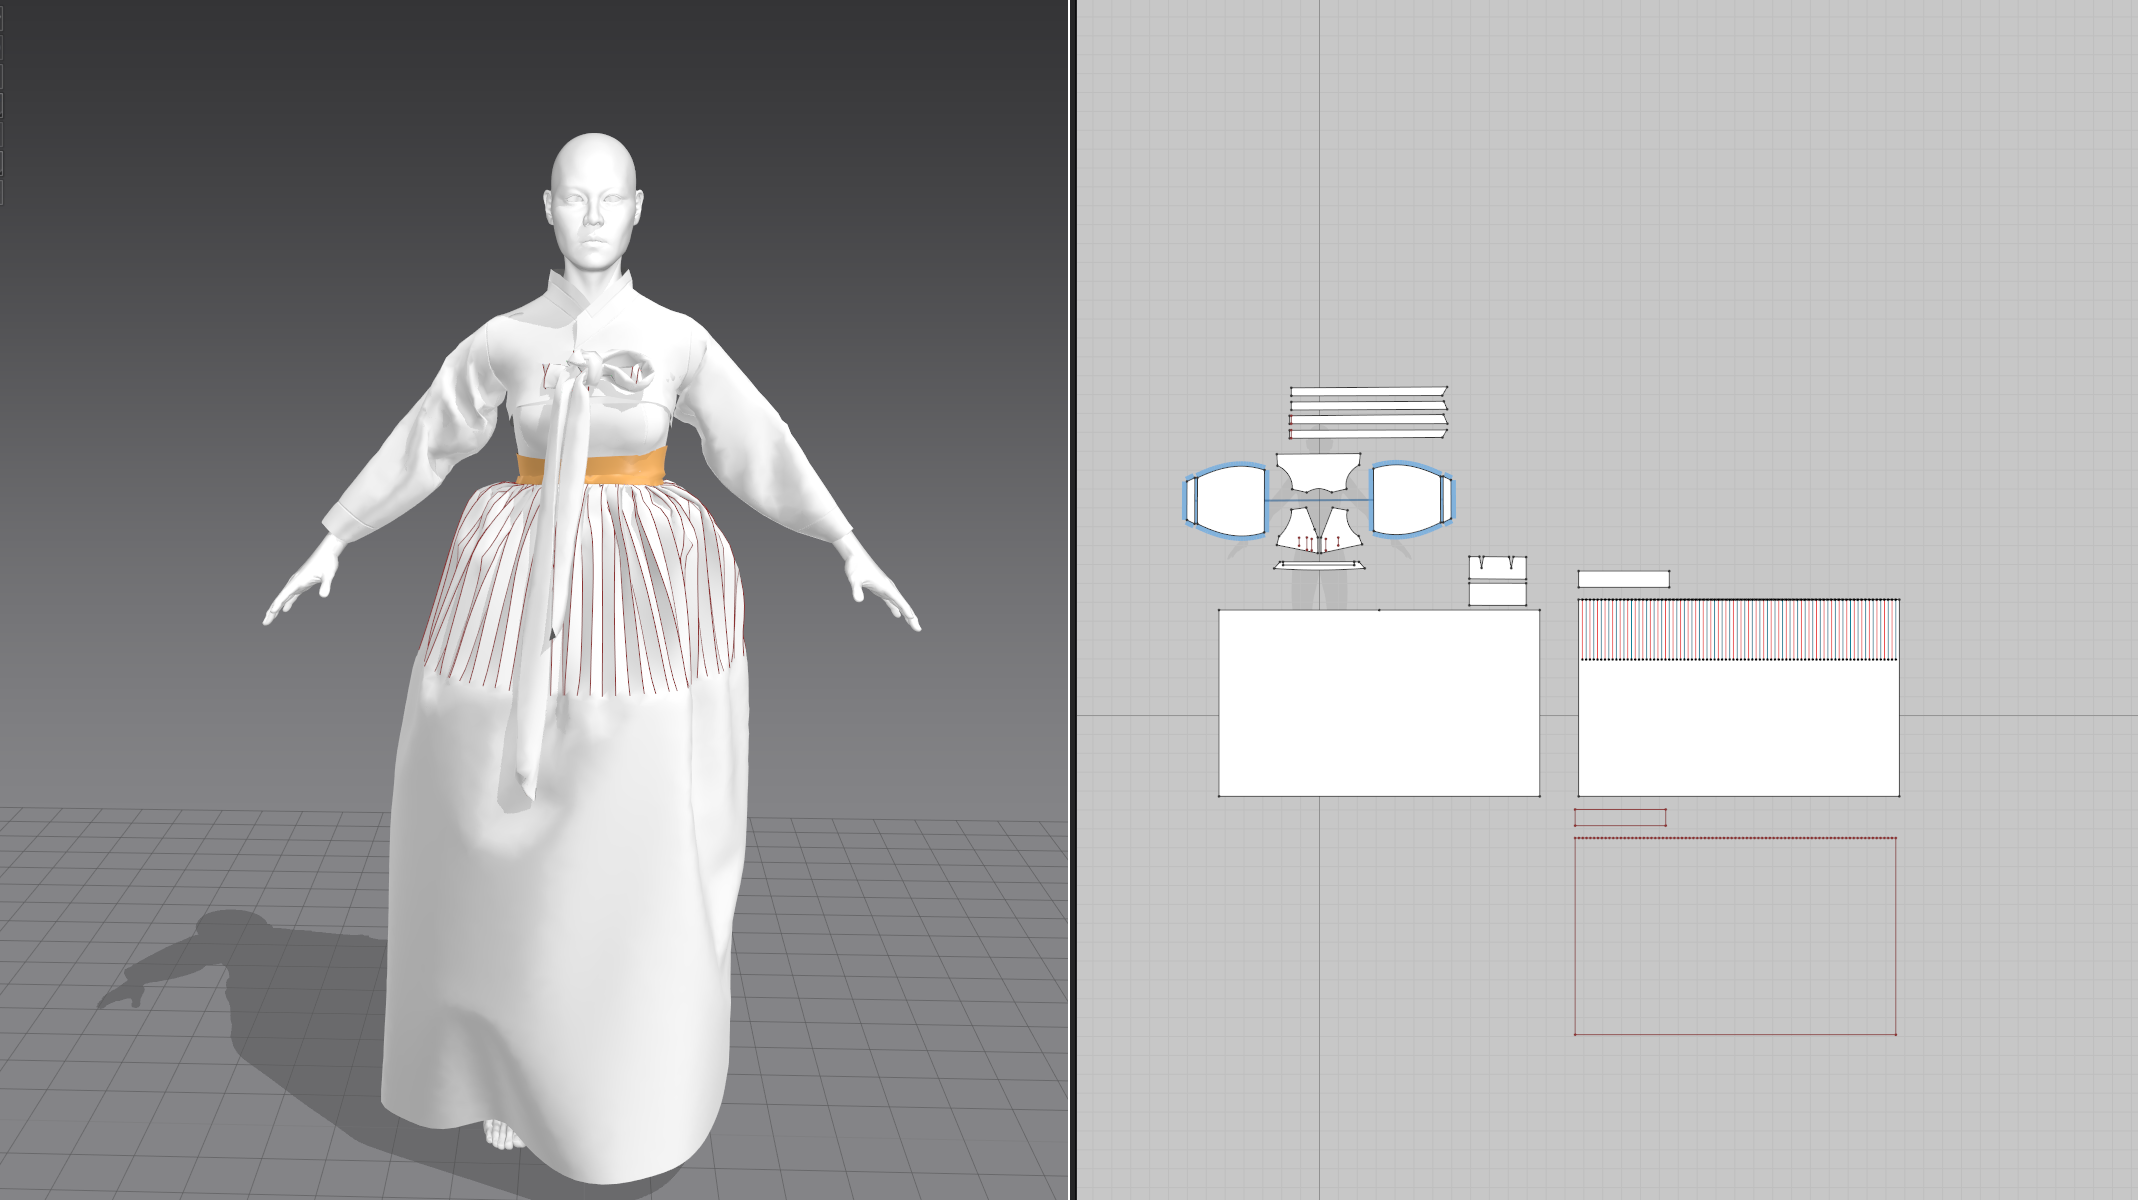
I am popping in again, this time to share the first tutorial I did for Marvelous Designer's Youtube Channel. In this tutorial, I go over the workflow on how to get your garments you made in Marvelous Designer ready for a VFX pipeline. I hope you get some tips and tricks in this video. I was able to create this cute little dress in Marvelous Designer. Always a fun challenge to do pleats, is that just me? Well, in any case, I hope you find the tutorial helpful!
Here is the link for the tutorial!
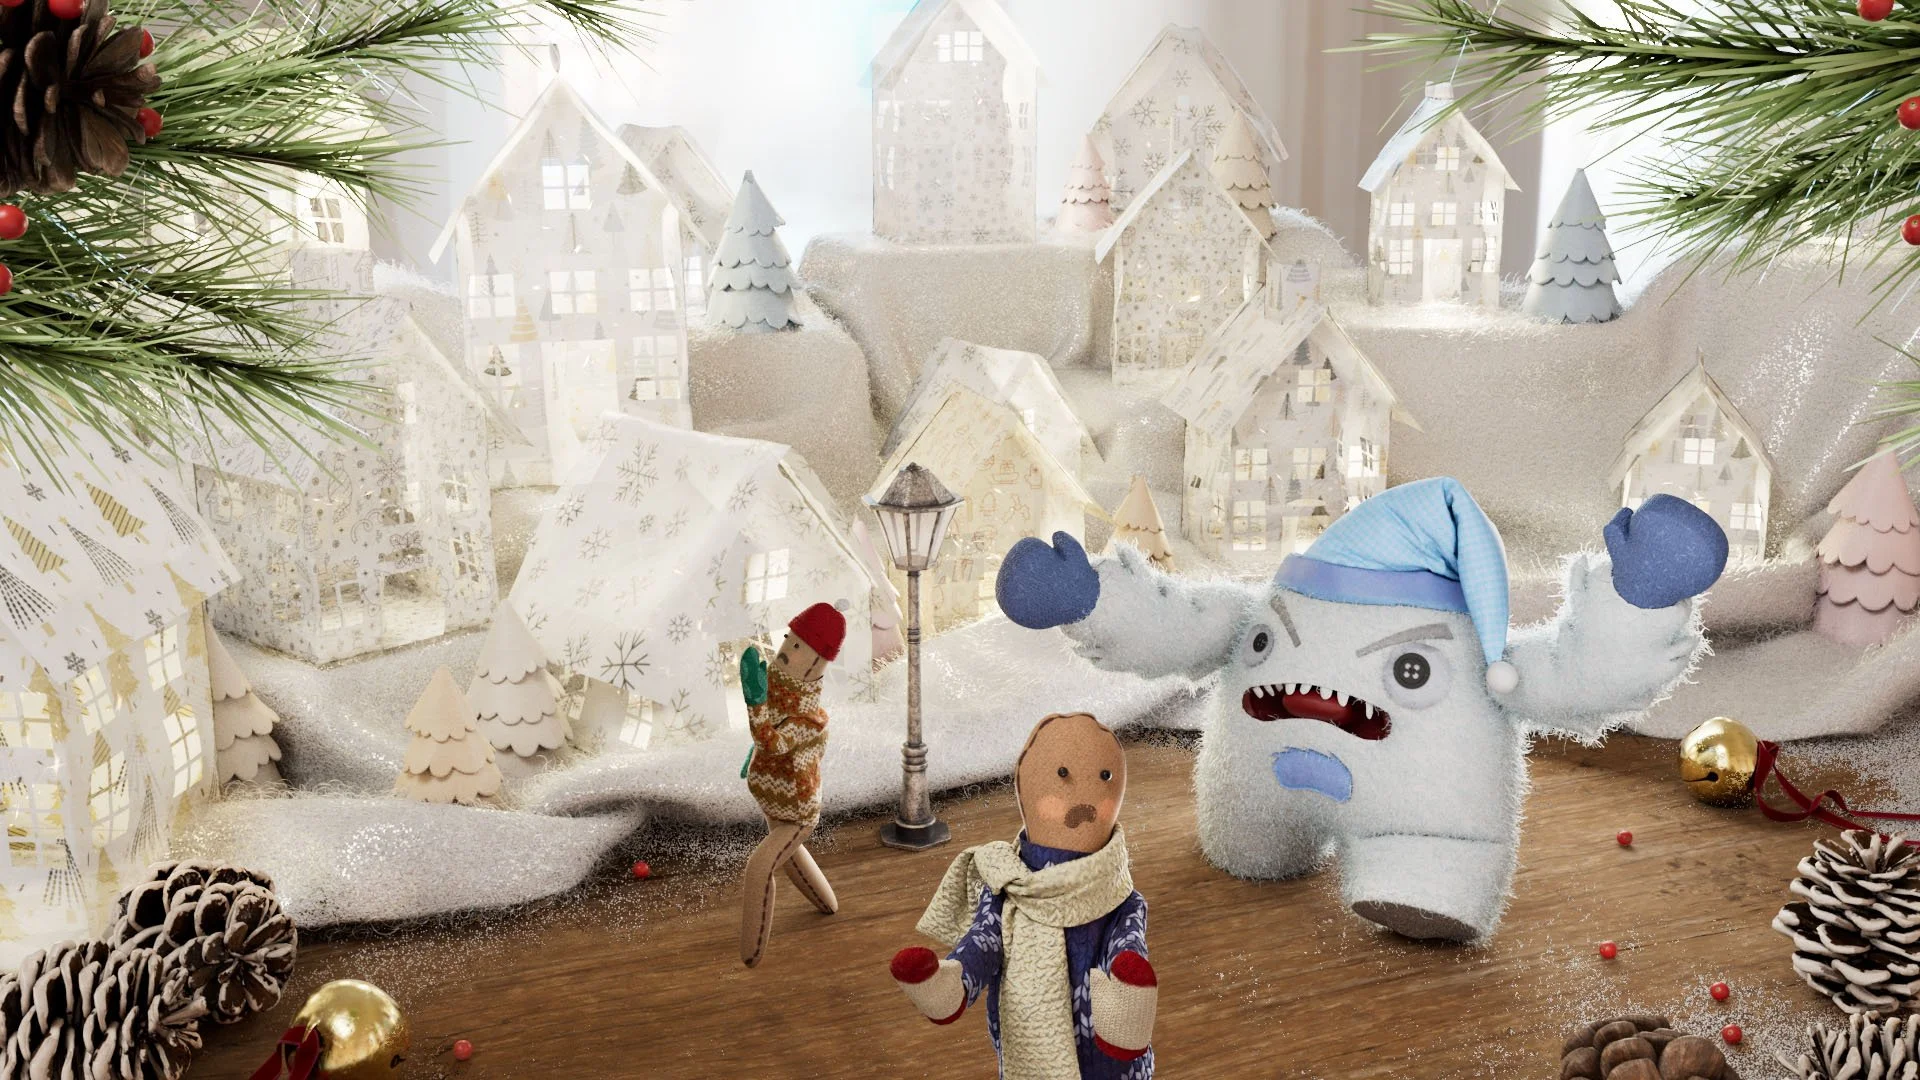
This piece was super fun to do. I was really excited because I never did a lighting scenario like this. I was in charge of the scene assembly, look-dev and lighting of the scene. I worked on texturing everything in the scene minus the monster dude, pine needles, and berries. I also helped optimize topology and UV the models. Our talented 3D designer Megan created the houses in Marvelous Designer and Brandon, our other fantastic 3D designer, modeled the snow particles, monster, pine needles, pine cones, berries, lamp, and bell. I created the scared dolls, paper trees, snow cloth, and did the x-gen for the scene! We had a lot of fun creating the dolls in Marvelous Designer and we're super excited to see entries for our contest! Good luck everyone and I hope you all participate!
Hi guys, it's been awhile but I'm back to tell you some exciting updates!
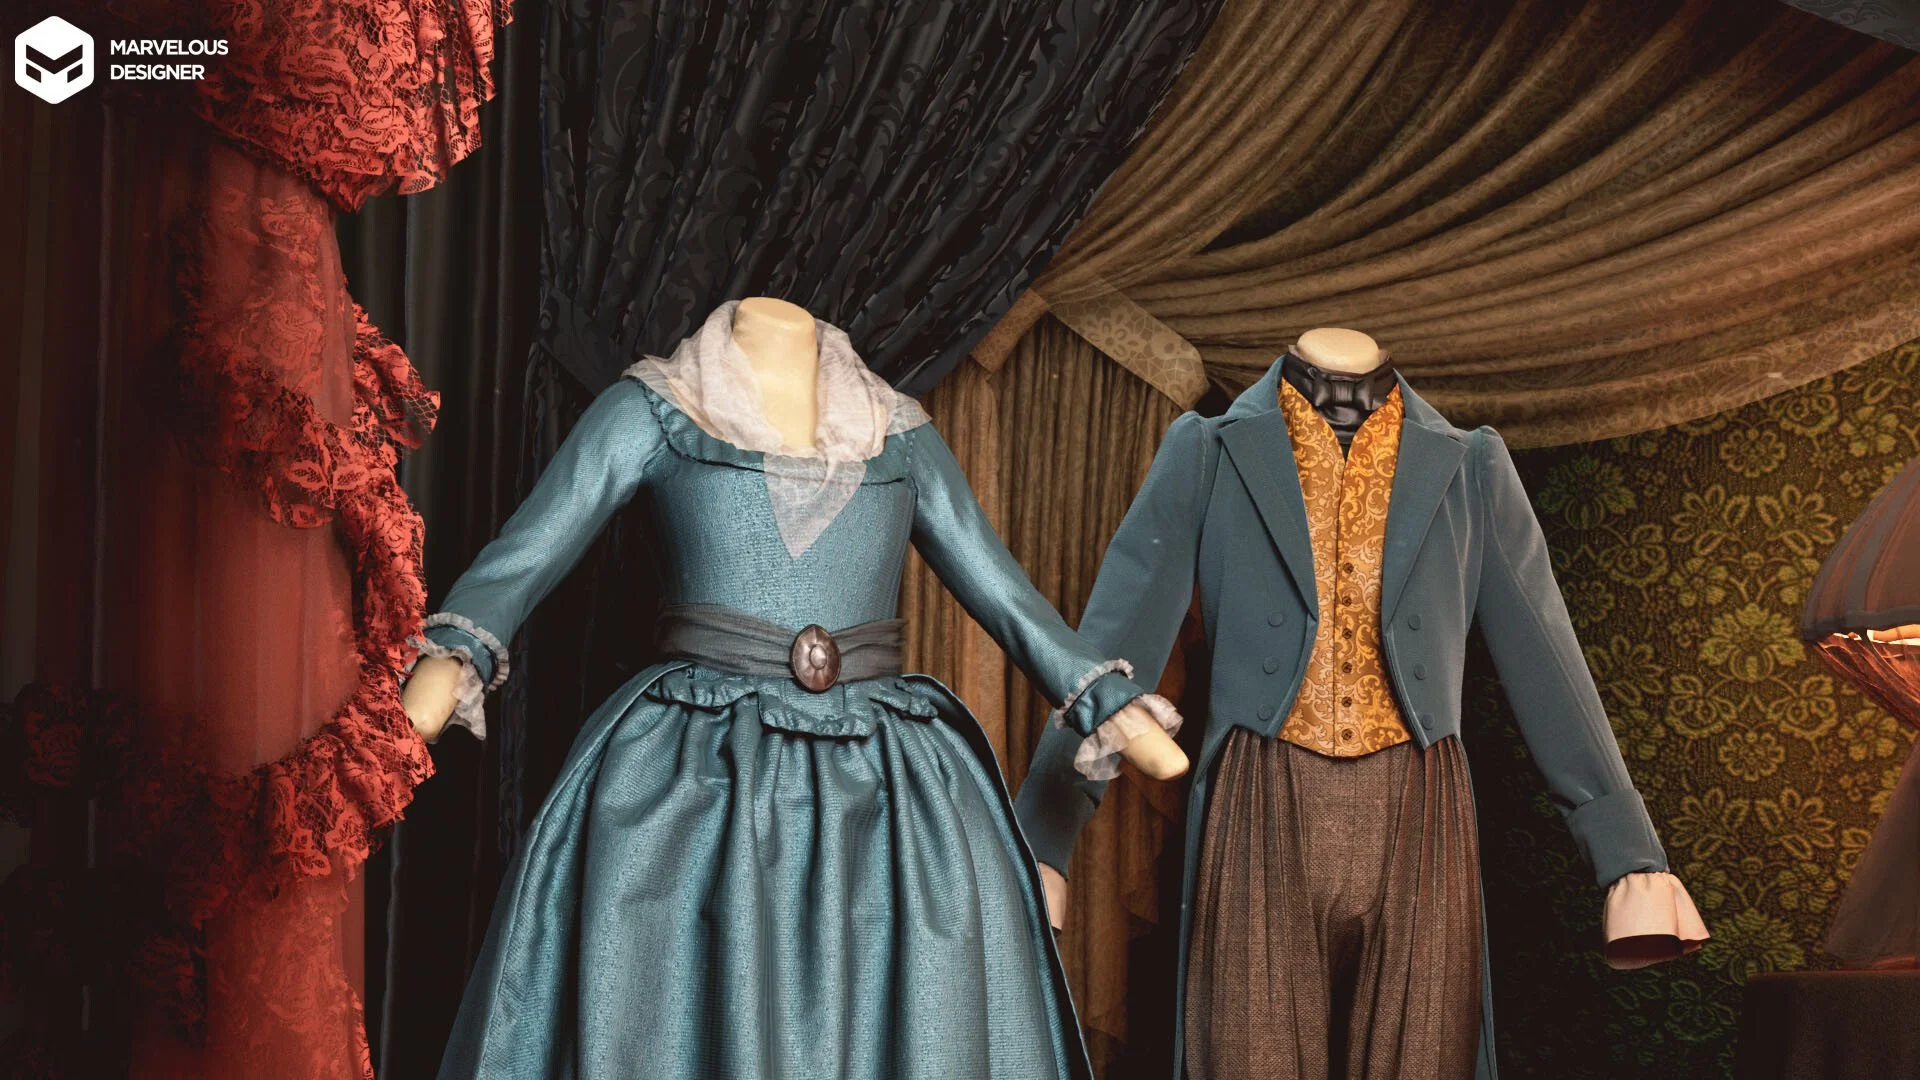
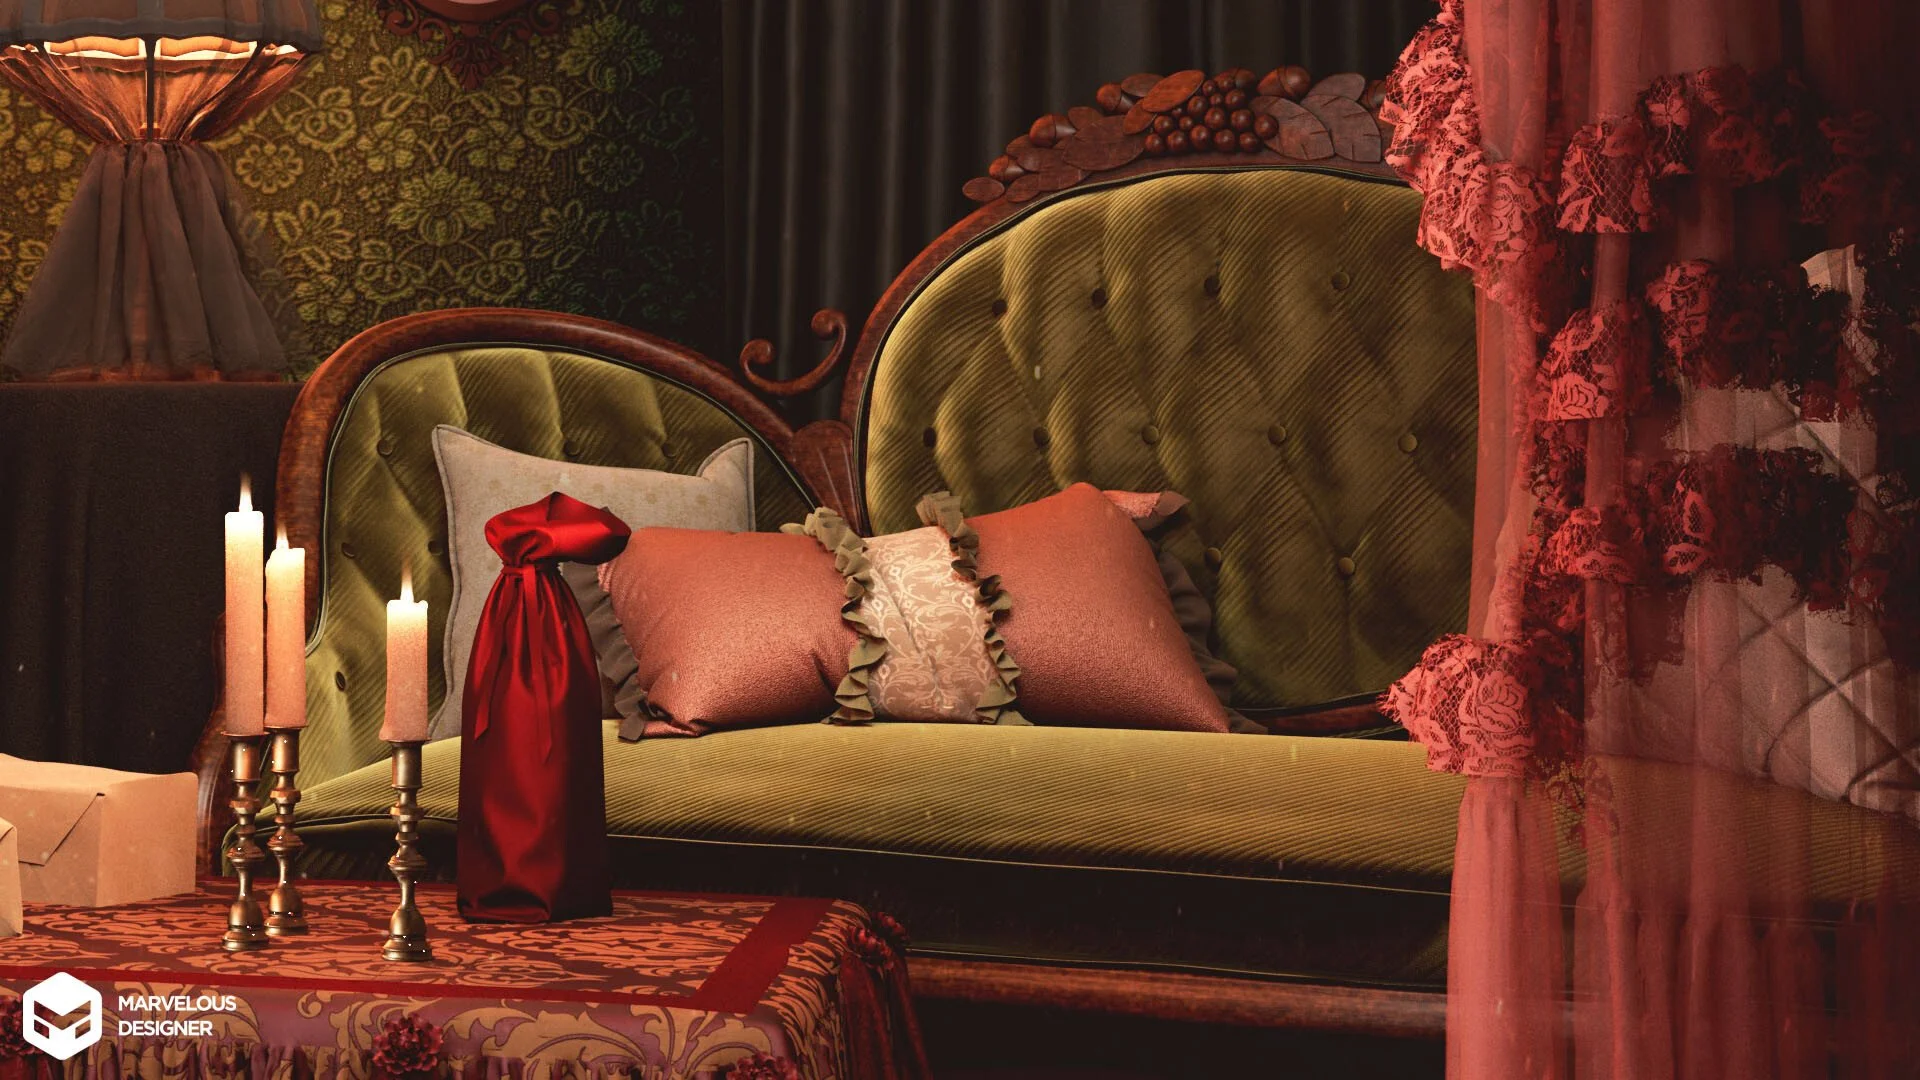
I recently joined the Marvelous Designer team as a 3D designer/Community Manager. I was so lucky to have this be my first project with them! For this scene we really wanted to utilize and showcase MD 11 in all its glory. I was in charge of look-deving, lighting/rendering the scene in Arnold which was a fun new challenge since I never used Arnold before. My fellow team member/ 3D Designer Megan was in charge of creating all the lovely curtains and table cloth. Brandon who is another 3D designer on our team modeled and textured the dress, lamp, lamp stand's table cloth, the beautiful cushions, candles, and picture frame in the back with our new logo. I modeled/textured the suit and sofa, and textured the table cloth and curtains. I hope you guys all check out the new release! We are very proud of it!
Concept by Kim Hyun Jung.
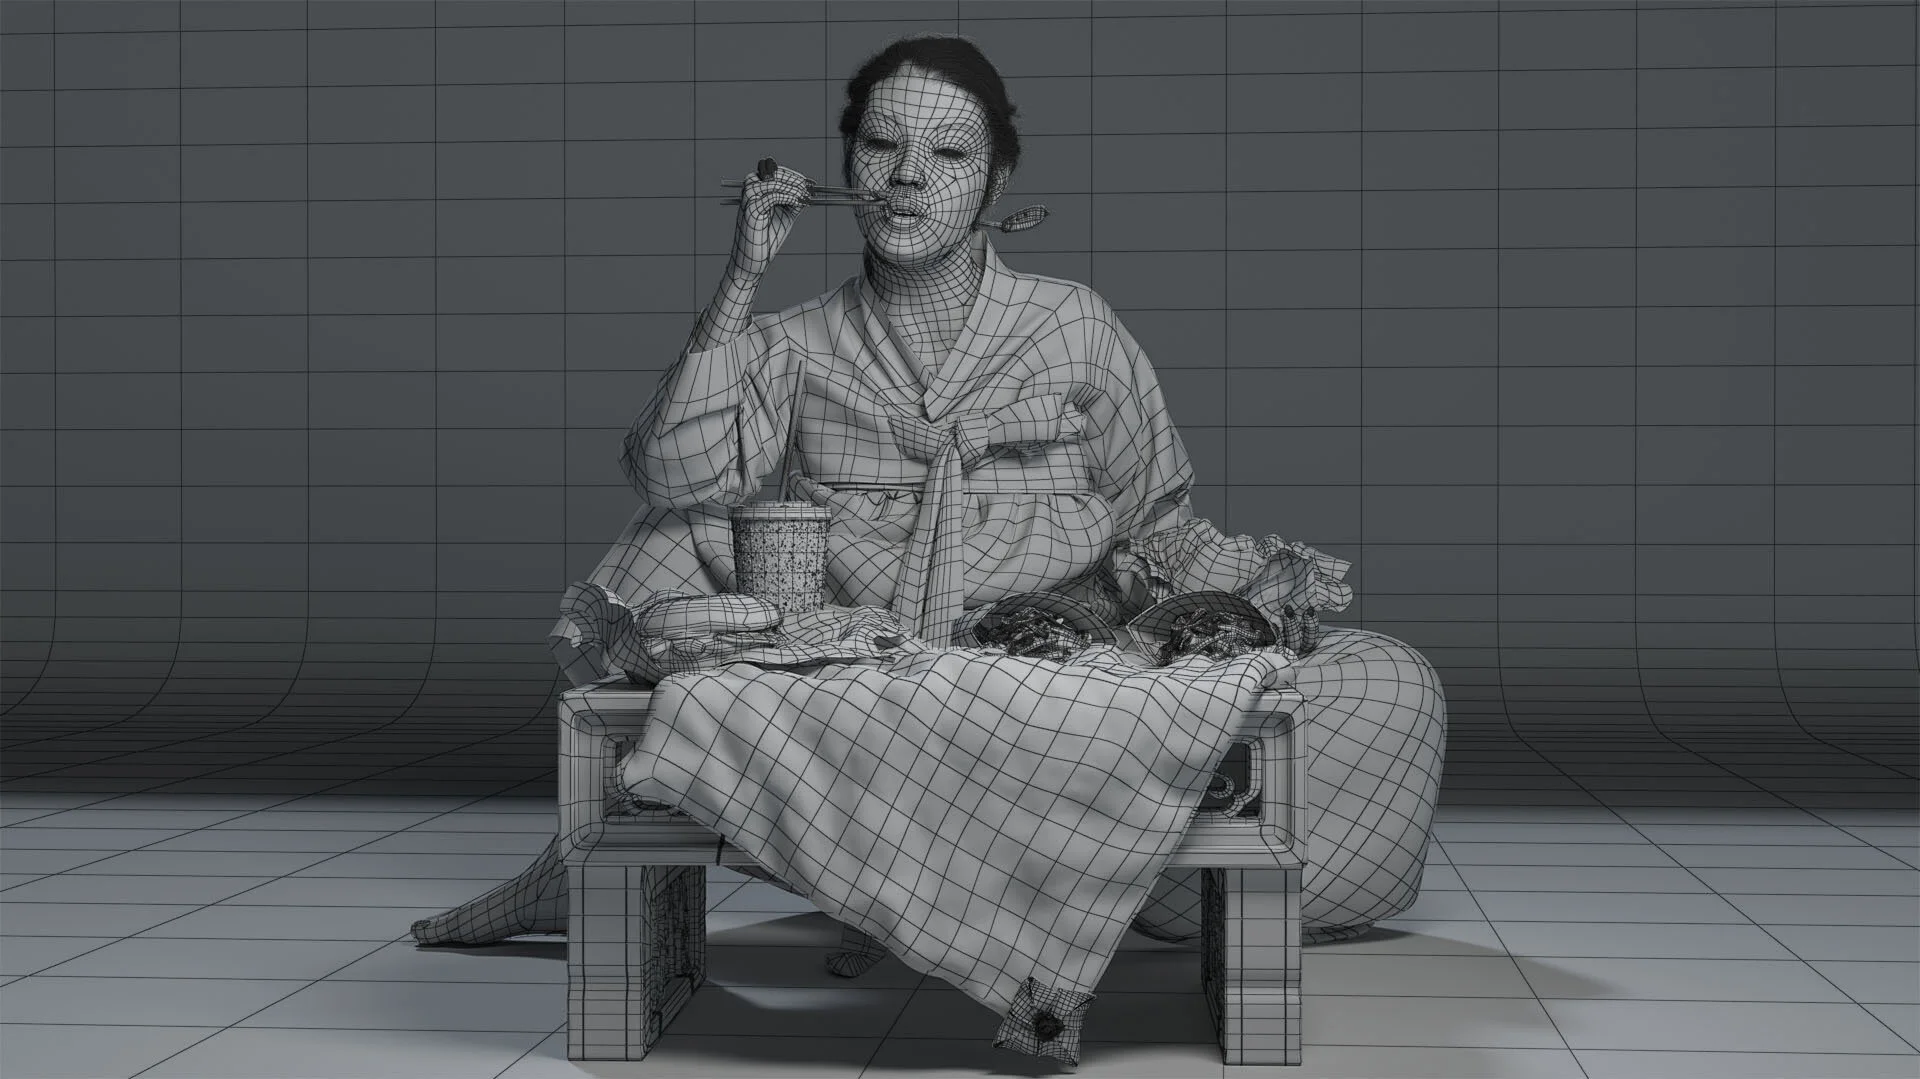
I loved recreating this piece because it is a fun commentary on the new generation of Korean girls. I modeled in zbrush, marvelous designer, and maya. I textured in mari and photoshop, and I rendered in vray. This project was a great opportunity for me to really utilize the hypershade in maya, and I really wanted to heavily work in hypershade to create a lot of my textures.
Larger Images at michele ahn's artstation
It was my first time trying to use animation to sim the clothing into pose in Marvelous Designer. The pose is so dramatically different from the A-pose, so I was surprised when the sim turned out really nicely. I would have to pause the animation from time to time to wait for the clothing to catch up with the model, but overall it was a painless process. I barely had to move the clothing after the animation was finished.
I used agisoft to scan burgers and fries. Really fun, but also very sick of eating burgers and fries.
The table cloth was a fun little exercise. I wanted to make sure that the UV shells were separated so later when I went into texturing, I could easily solo out the colors of each panel of the cloth. The little clothing pin was a new adventure too, I used origami principles to create it. I had so much fun pinning and folding, pinning and folding to create that little guy.
I used blend materials to get glitter on my nails and eye shadow, blend materials are my best friends now. My instructor Miguel Ortega, also taught us how to use a samplerInfo node to control how the shader would behave according to the camera. It was super effective in getting my nails and make up to behave iridescently as the camera moved around them.
I used blend materials to get glitter on my nails and eye shadow, blend materials are my best friends now. My instructor Miguel Ortega, also taught us how to use a samplerInfo node to control how the shader would behave according to the camera. It was super effective in getting my nails and make up to behave iridescently as the camera moved around them.
This is the original concept
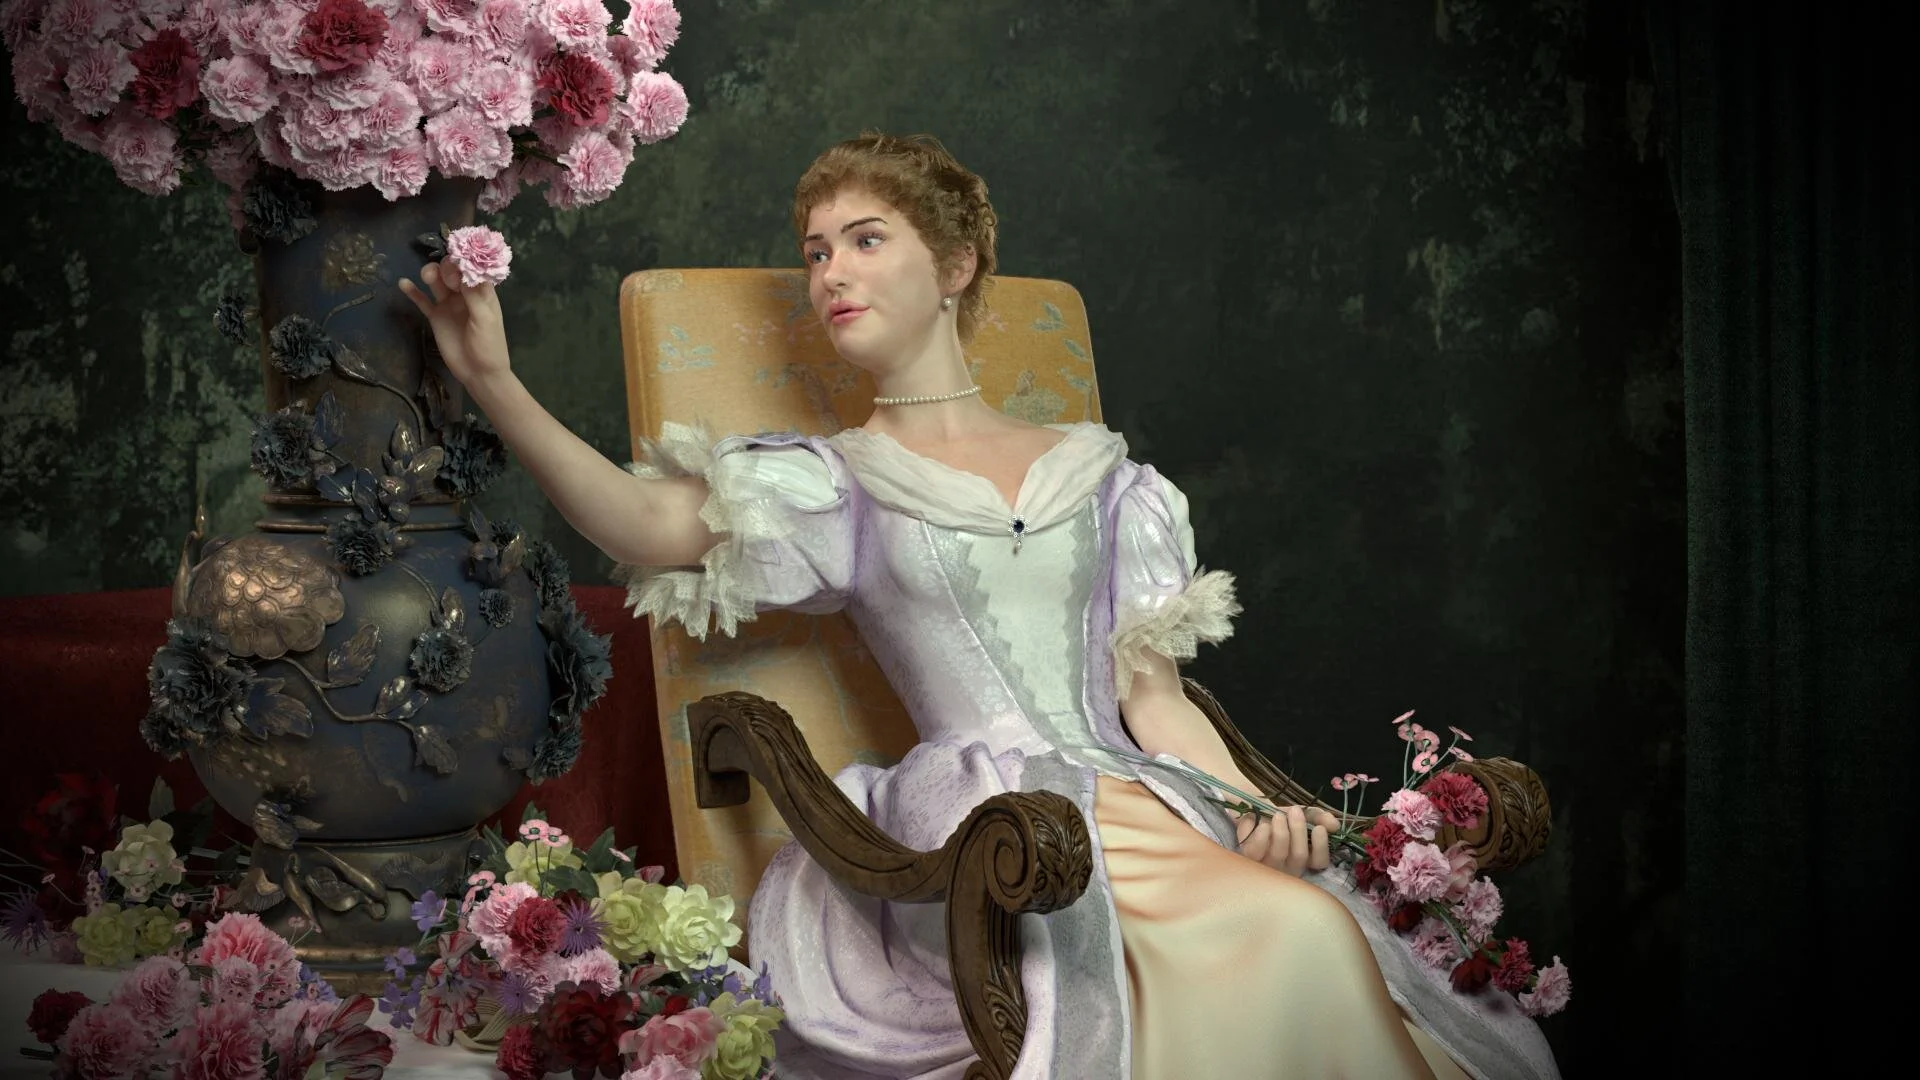
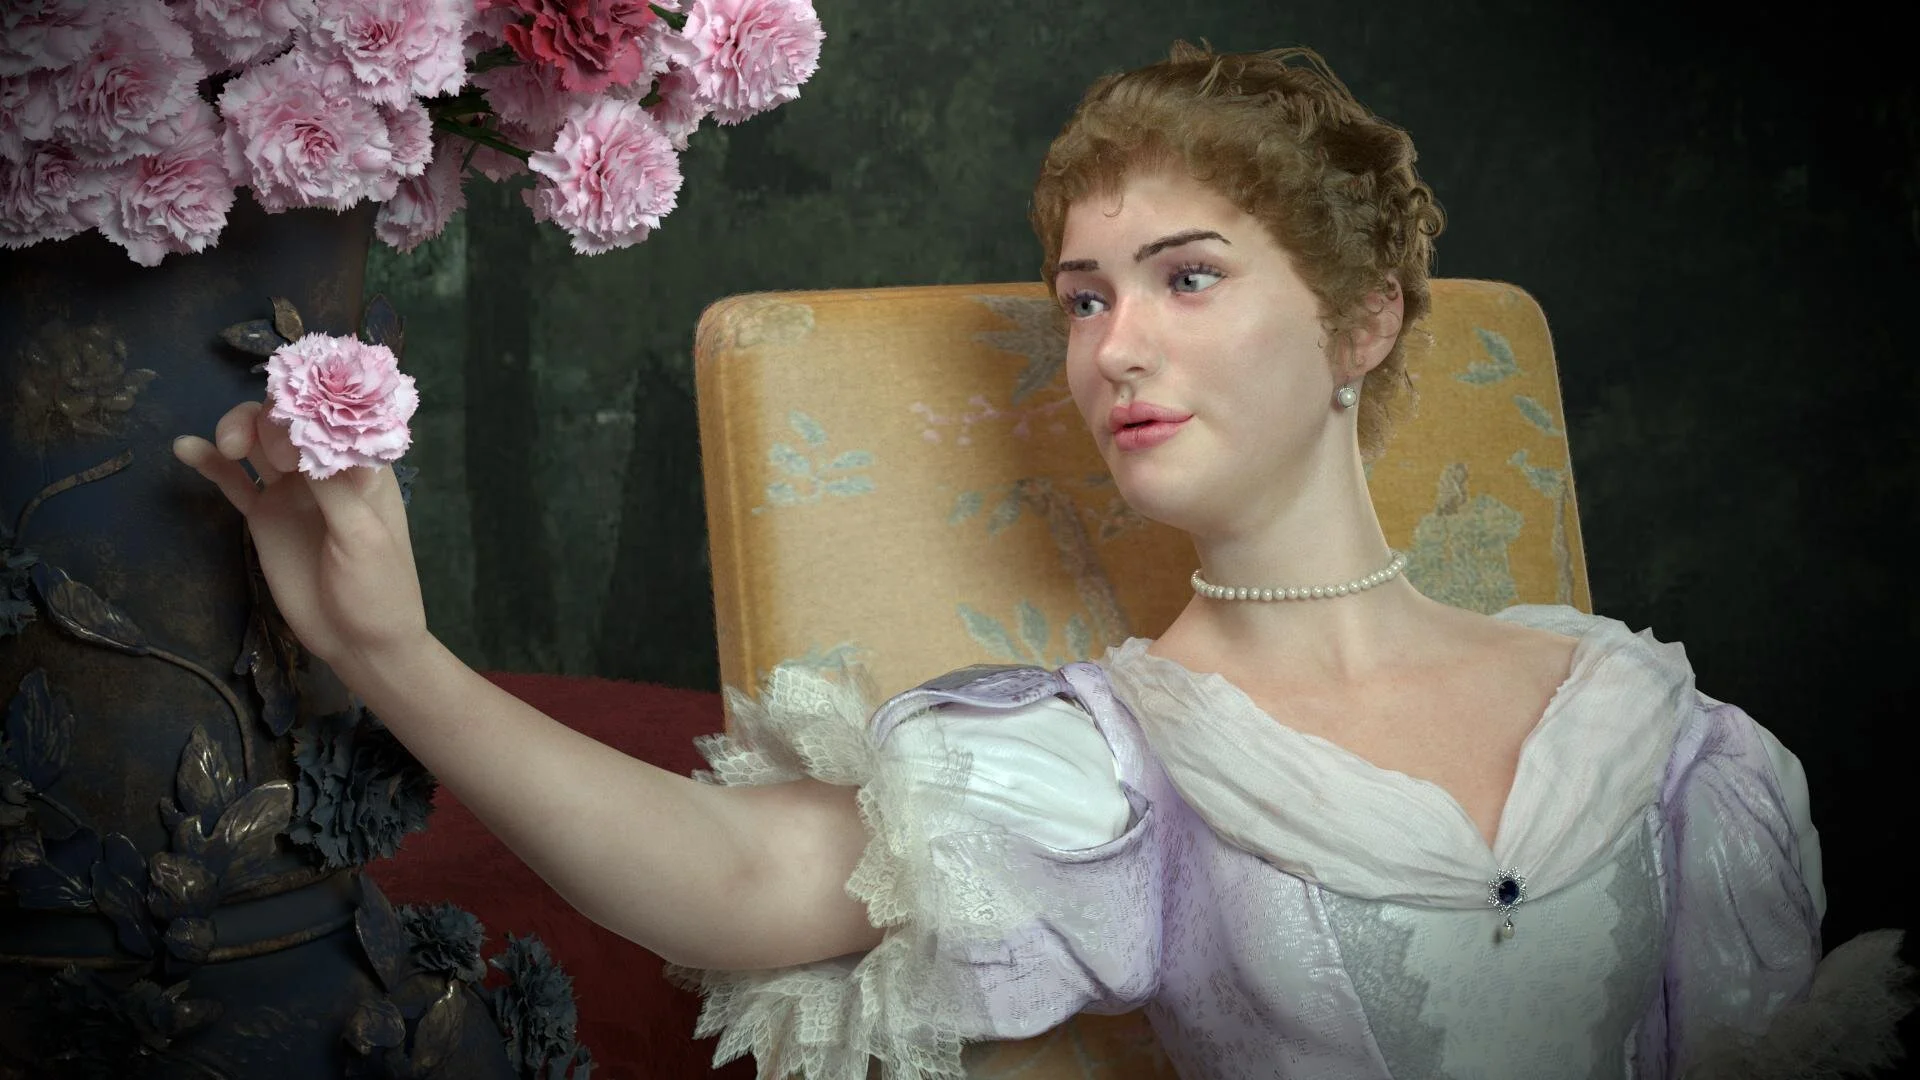
This is done after Wladislaw Czachorski’s “The Blossom of Youth”. I was super excited to attempt a painting. I enjoyed look dev-ing this piece since there were so many different textures and materials to play around with. Modeled in Maya and Zbrush. Dress was done mainly in Marvelous Designer. Xgen for the hair, and V-ray fur on the chair, table cloth, and curtain in the background. Textured in Mari, Substance Painter, and Photoshop. Rendered in V-ray and comped in Nuke. For the dress, I stayed inside of the Hypershade Editor in Maya and used a lot of masks to achieve the Damask fabric. Again, I used a sampler info node in Maya to get the fabric to look like satin. I love that node!
Larger images on Michele Ahn's artstation
“The Blossom of Youth” by Wladislaw Czachorski
This is a character I made using one of YunXiang Zhou’s designs for clothing. YunXiang’s collection of utilitarian clothing is one of my favorite and inspiring bodies of work, so I was happy to have a chance to create it in 3D. I used marvelous designer, zbrush, and maya to sculpt, and I used xgen for the hair. Textured in mari and rendered in vray.
Larger images on Michele Ahn's artstation
I wanted to practice eyes for this model. I really wanted to convey an emotion even through his glasses. I added a little tint to the lens as well as a noise, and it brought a softness to his gaze
Vray fur is one of my favorite things to do so that it helps blur the silhouette of clothing. I did it for the hat and it really helped sell the shader
He has many layers of clothing on him, so it was a challenge in MD to get them to all coordinate with each other, but it was definitely a fun challenge (especially the straps on the apron) The success of the apron was turning gravity to 0 and pinning on every single fold.
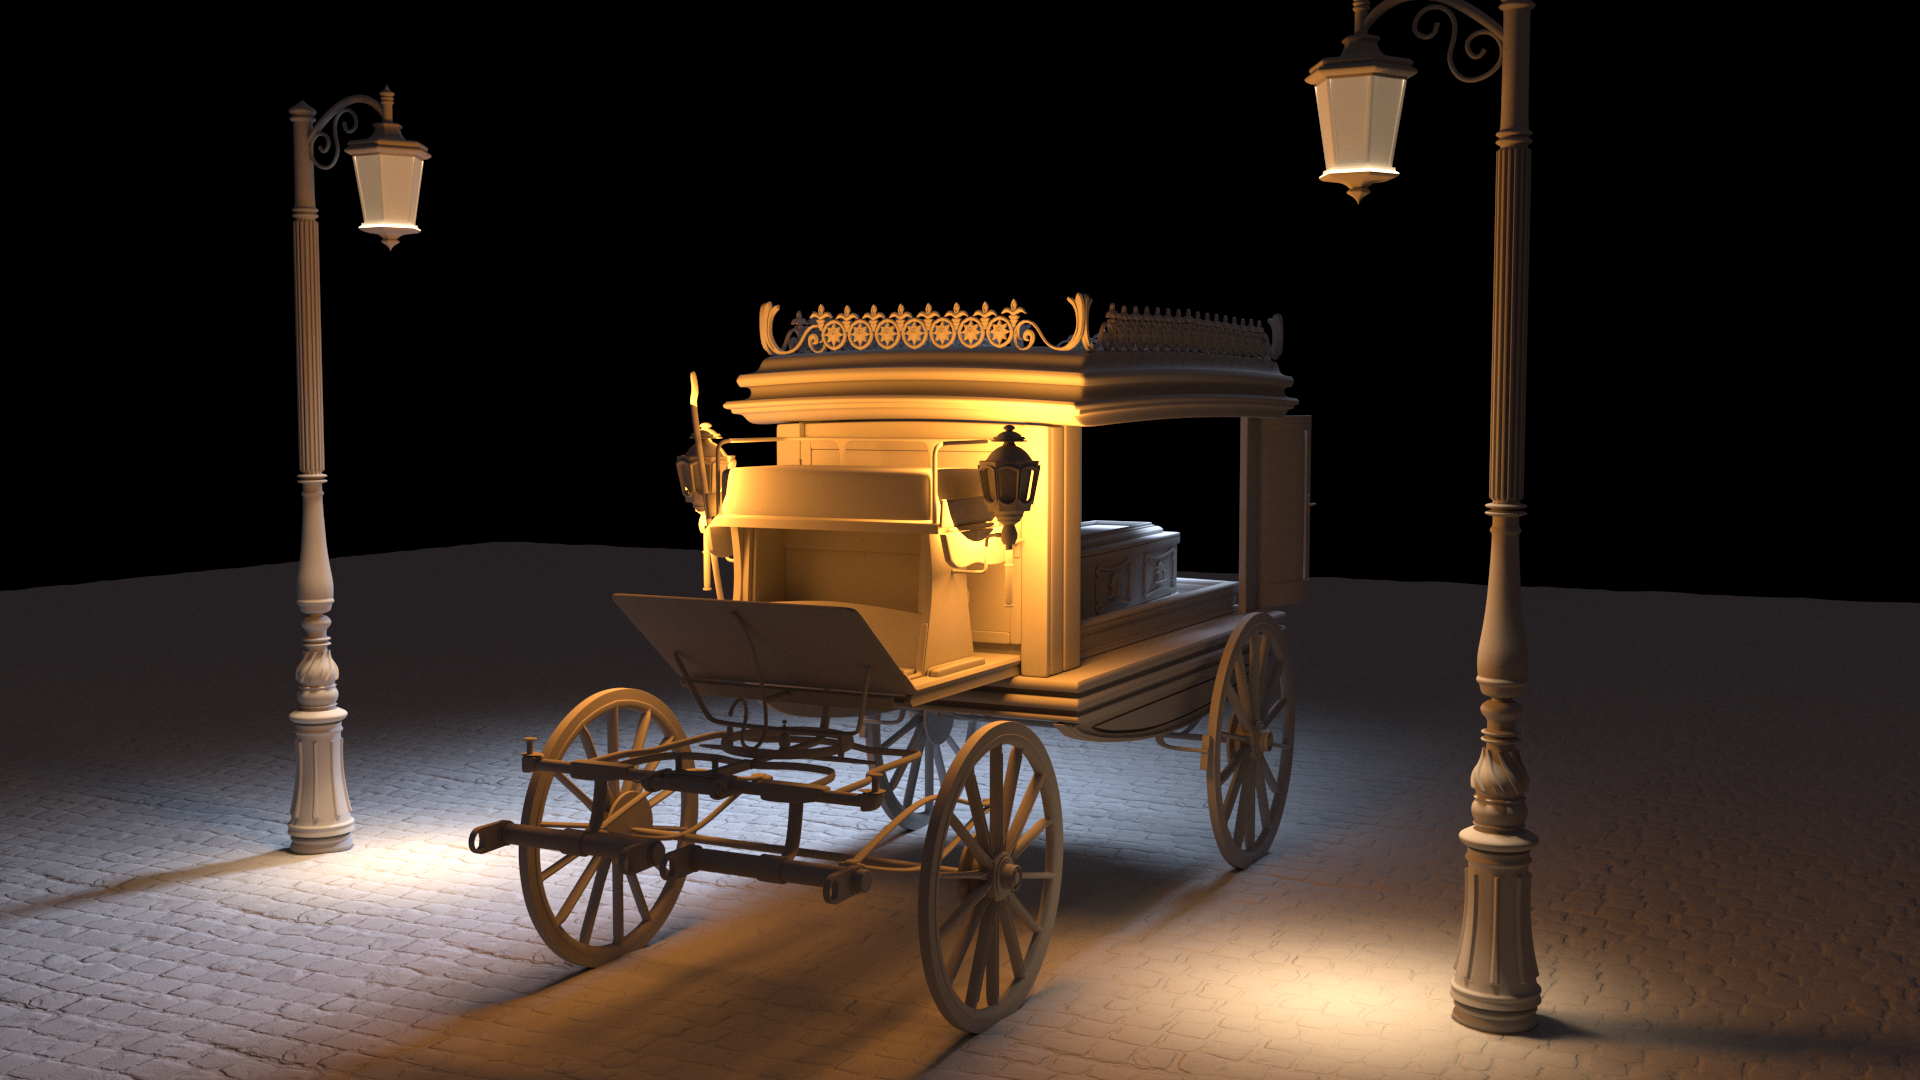
I love funeral carriages, and I really wanted to create one in a night time setting.
I modeled mostly in maya and added additional detail in zbrush. Textured in substance painter, and rendered in vray and nuke. I used SpeedTree for the trees and grass.
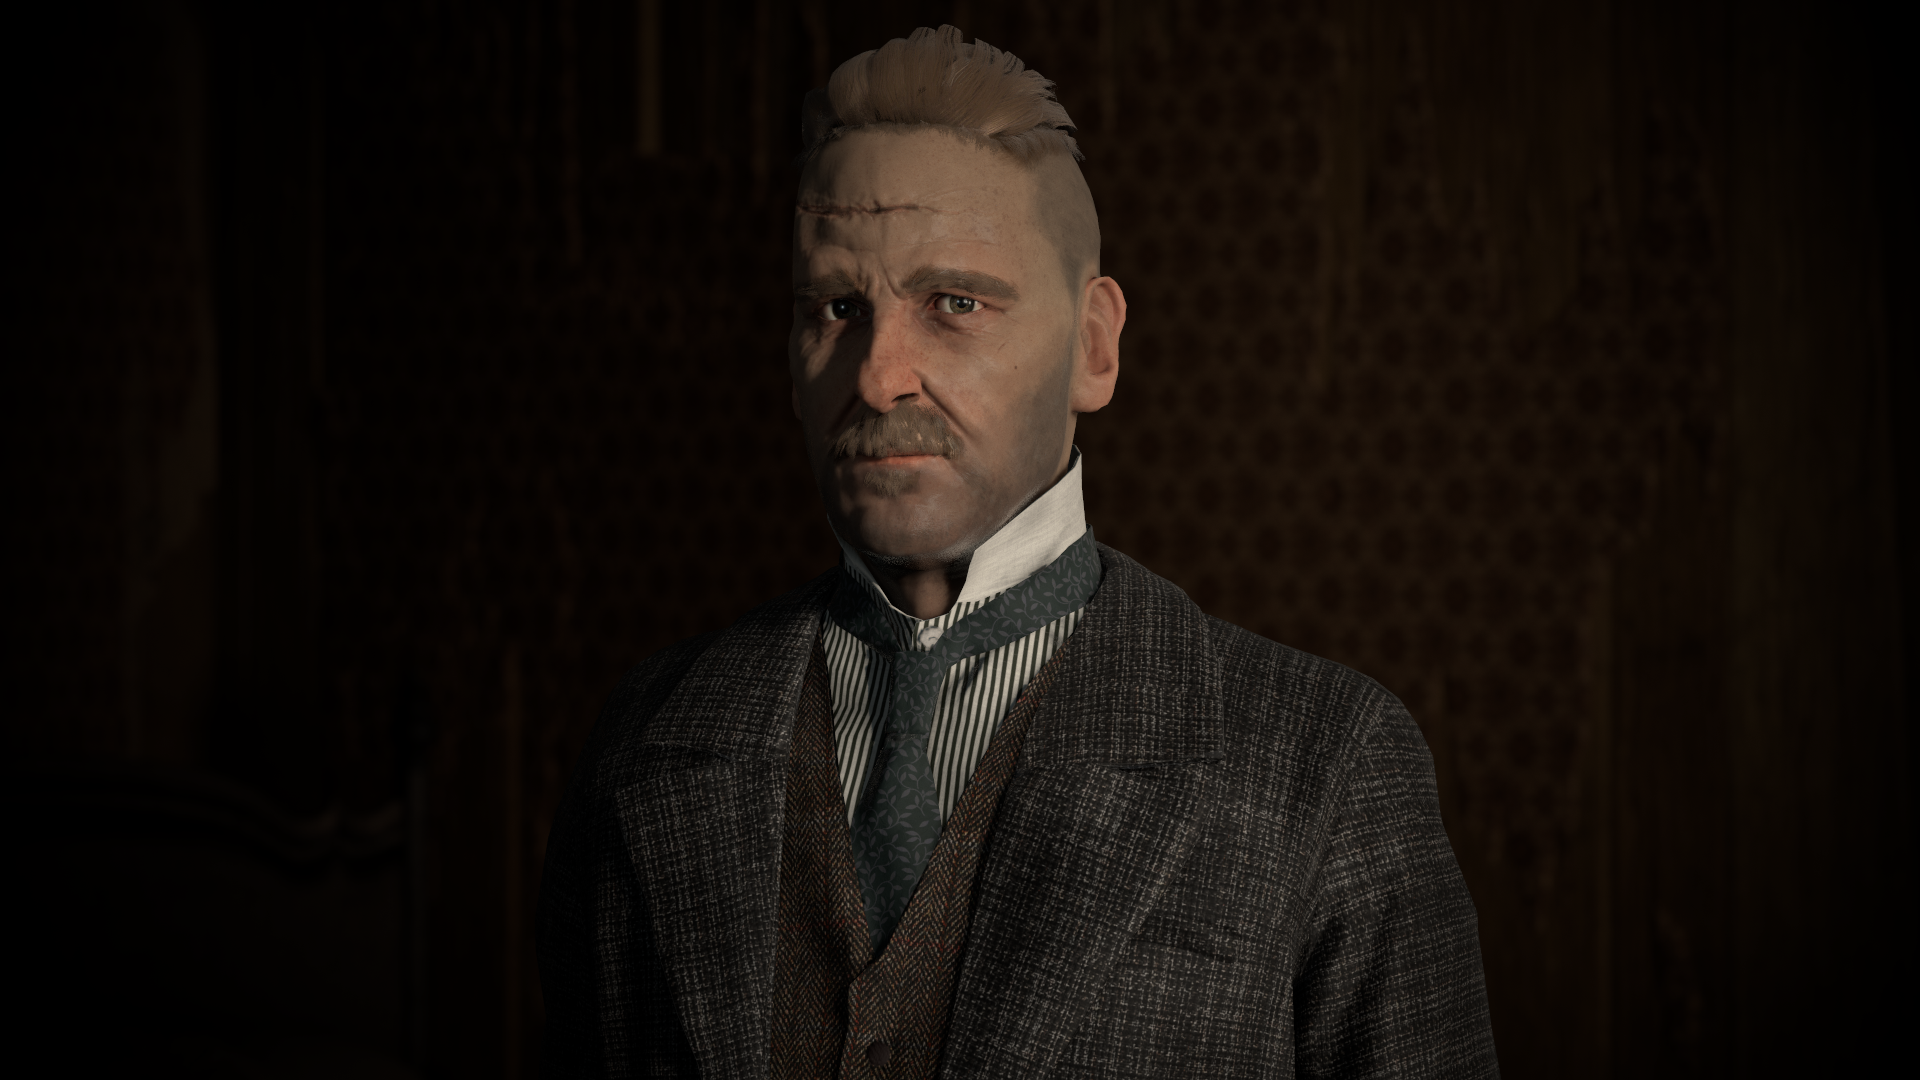
I binged watched Peaky Blinders and became obsessed with the look of the cast. I really wanted to do Arthur, I thought his face was so interesting. This is a character I made ready for games. Sculpted and modeled in zbrush. marvelous and maya. I rendered in marmoset and textured in substance painter. This was a super fun project.